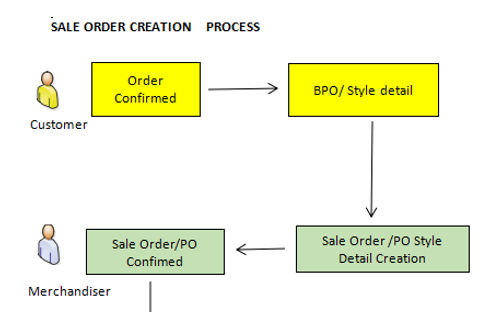
To be able to use the Sale Order creation function, users can access the function via the following link:
Link: FXPRO --> Order Management --> Work Area--> Order Management
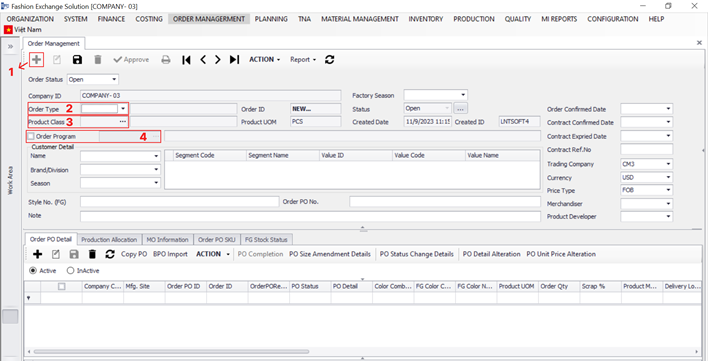
1. Create Header Sale Order.
- Step 1: Click symbol “+” or press button Ctrl + N on your keyboard to create a new Sale Order
- Step 2: Select Order Type (Sample Order, Production Order).
- Step 3: Select Product Class of sale order (Outer wear, Winter wear,...)
- Step 4: Select Order Program (if available) by ticking the box and choosing
- Customer detailed information in Customer Detail section (step 5,6,7) will automatically displays base on choosen Order Program
User can learn how to create a new Order Program by clicking here
If there is no Order program: follow step 5,6,7
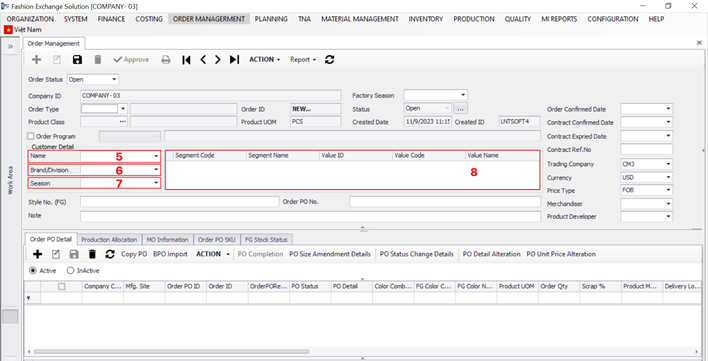
- Step 5: Select customer at Name field
- Step 6: Select Brand/Division of customer
- Step 7: Select customer season
- Step 8: Select Segment detail if available
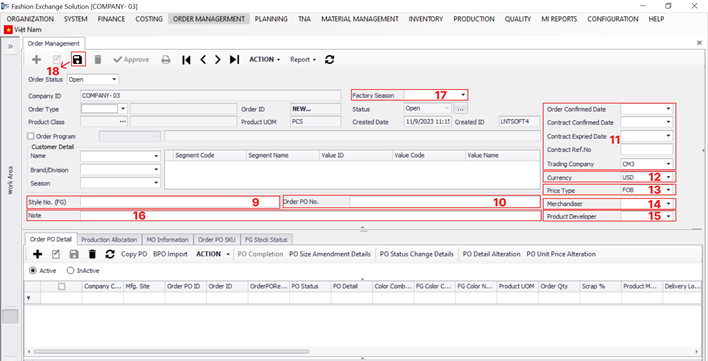
- Step 9: Order PO style: user enter style of PO
- Step 10: Order PO No.: user enter PO number
- Step 11: Select Order Confirmed Date (The date order is confirmed)
+ Contract Confirmed Date (The date contract is confirmed): allow to keep blank (Default = Order Confirmed Date)
+ Contract Expired Date (The date contract is expired): allow to keep blank
+ Contract Ref No (Contract reference number): user enter contract reference number there (Allow to keep blank)
+ Trading company (The company make the transaction): system defaults login company but allow to change
- Step 12: Select Currency (Default currency is USD)
- Step 13: Select Price Type (Default price type is FOB)
- Step 14: Select Merchandiser
- Step 15: Select Product Developer
- Step 16: Enter Note if available
- Step 17: Select Factory Season
- Step 18: Click save symbol to complete creating a header sale order
1.1. Product Details
- Step 1: Click on Product Details button
- Step 2: Choose image of FG for Sale Order
- Step 3: Click Save button to save image
- Step 4: In the FG Item Detail tab, Select FG Item ID
- Step 5: Click button Save to save FG Item for Sale Order
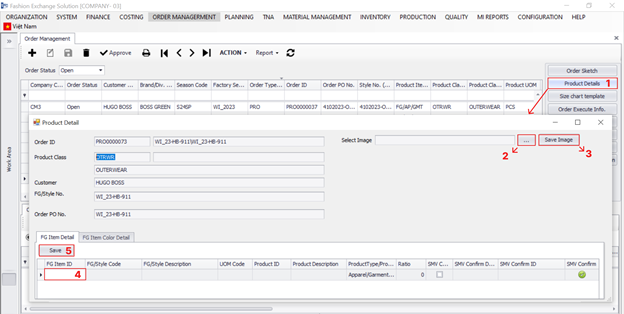
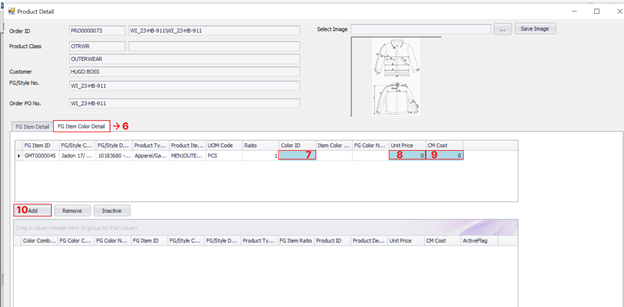
- Step 6: Switch to FG Item Color Detail tab to add FG color for Sale Order by clicking FG Item Color Detail
- Step 7: Select Color ID for FG
- Step 8: Enter Unit Price of the FG Color
- Step 9: Edit CM Cost of the FG Color if want (Default CM Cost is equal Unit Price)
- Step 10: Click Add button to save information
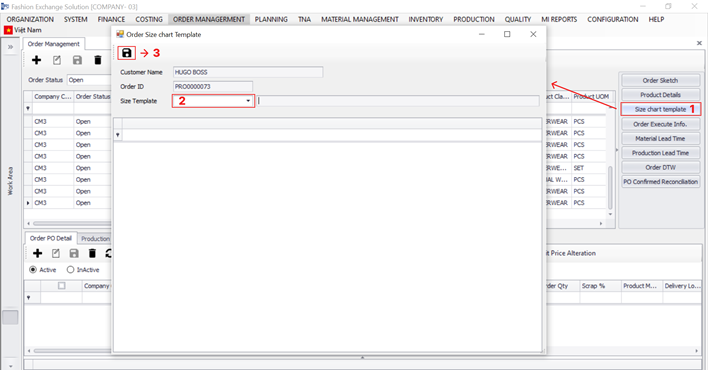
1.2. Size Chart Template
- Step 1: Click on Size Chart Teplate button
- Step 2: Choose Size Template
- Step 3: Click on Save icon
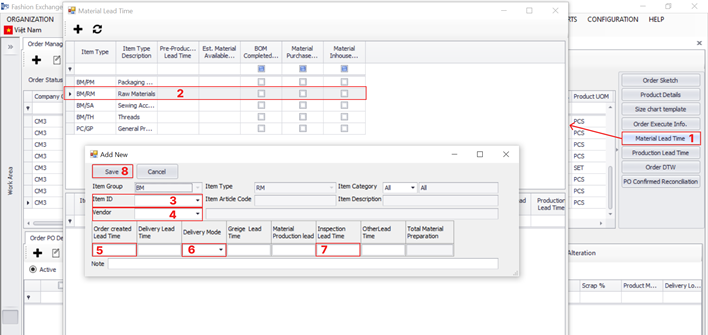
1.3. Material Lead Time
- Step 1: Click on Material Lead Time button
- Step 2: Choose Raw Material line and double click it
- Step 3: Choose Item ID
- Step 4: Choose Vendor
- Step 5: Enter Order Created Lead Time (Number of days it takes to create sale order)
+ Delivery Lead Time (The time required for material to arrive at inventory): Automatically loaded from Vendor function
- Step 6: Choose Delivery Mode (Sea, Air, Ground,...)
+ Greige Lead Time (Number of days it takes vendor to prepare ingredients for special orders): user enters (optional)
+ Material Production Lead Time (Tine required for vendor to do production): Automatically loaded from Vendor function
- Step 7: Enter Inspection Lead Time (Number of days it takes to do inspection)
+ Other Lead Time (Other required time to complete preparing raw material for production): user enters (optional)
- Step 8: Click on Save button
2. Create BPO:
2.1. Create new BPO line:
- Step 1: Choose Sale Order that want to create a BPO line
- Step 2: Click + icon
- Step 3: Enter Order PO detail (Order PO code)
- Step 4: Choose Color Combination ID
- Step 5: Choose Delivery Location
- Step 6: Choose Original Delivery Date
- Step 7: Choose Lattest Delivery Date
- Step 8: Choose Plan Ex-Factory Date
- Step 9: Choose Delivery Term
- Step 10: Choose Mfg Company ID ( Default company is login company) and Mfg Site
- Step 11: Click Save icon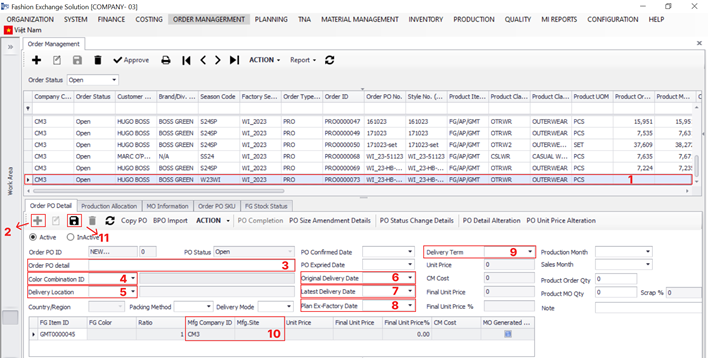
- Other data fields:
+ Order PO ID: Automatically create by sytsem
+ PO Status: Default status is Open and is automatically changed when user approves, deletes or cancels BPO
+ Country/ Region: Automatically load base on Delivery Location that user chooses
+ Packing Method: User chooses one of packing methods (Case, Single,...) (optional)
+ PO Confirmed Date: User chooses (optional)
+ PO Expired Date: User chooses (optional)
+ Unit Price/ CM Cost/ Final Unit Price/ Final Unit Price %: Automatically loaded base on data that entered in FG Color of Product Details.
+ Production Month/ Sale Month: User chooses (optional)
+ Product Order Qty/ Product MO Qty: User chooses (optional)
+ Note: User enters note for BPO (optional)
+ FG Item ID/ Ratio: Automatically loaded base on data choosed/ entered in Product Detail
+ FG Color: Automatically loaded base on Color Combination ID choosed
+ Unit Price/ CM Cost/ Final Unit Price/ Final Unit Price %: Automatically loaded base on data that entered in FG Color of Product Details but user can change
+ MO Generated Status: Automatically check when user creates MO for the BPO line
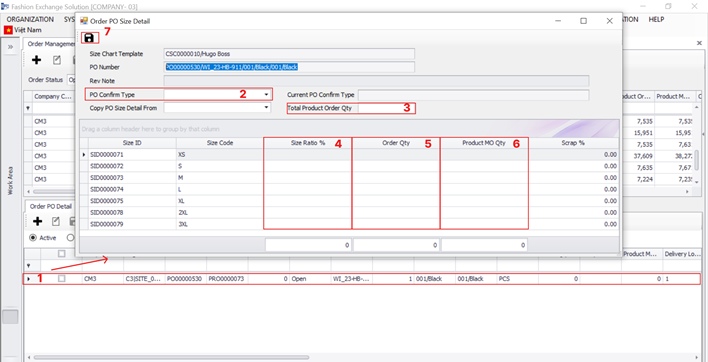
2.2. Enter Order PO Size Detail:
- Step 1: Choose a BPO line and double click it
- Step 2: Choose PO Confirm Type (Ratio Commit, Offficial PO Confirm)
Note: If there is a BPO that has been already entered size detail and has same ratio with other BPO line, user can choose it at "Copy PO Size Detail from" field and change Total Product Order Qty. System wil automatically calculate Order Qty and MO Qty.
- Step 3: Enter Total Product Order Qty (it is compulsory if user wants to enter quantity of BPO line by Size Ratio %)
- Step 4: Enter Size Ratio % (or system will automatically calculate if users have already entered Total Product Order Qty and Order Qty)
- Step 5: Enter Order Qty (or system will automatically calculate if users have already entered Total Product Order Qty and Size Ratio %)
- Step 6: Enter Product MO Qty (if it is different from Order Qty)
Note: System just allows to enter MO Qty bigger than Order Qty
- Step 7: Click Save icon
It is all the steps that user has to follow to create a full sale order on FXPRO system.